Method
Reference inventory vs field: reading a discrepancy U by U
A rack photo compared with its inventory gives six possible results. Understanding them means knowing what to correct, what to check and what to leave as is.
Contents
An inventory describes the rack as it should be. A photo shows the rack as it is. Between the two lie forgotten moves, equipment installed in a hurry, removals never recorded. The compared survey is designed to make these discrepancies visible, U by U, and to let you decide on each one.
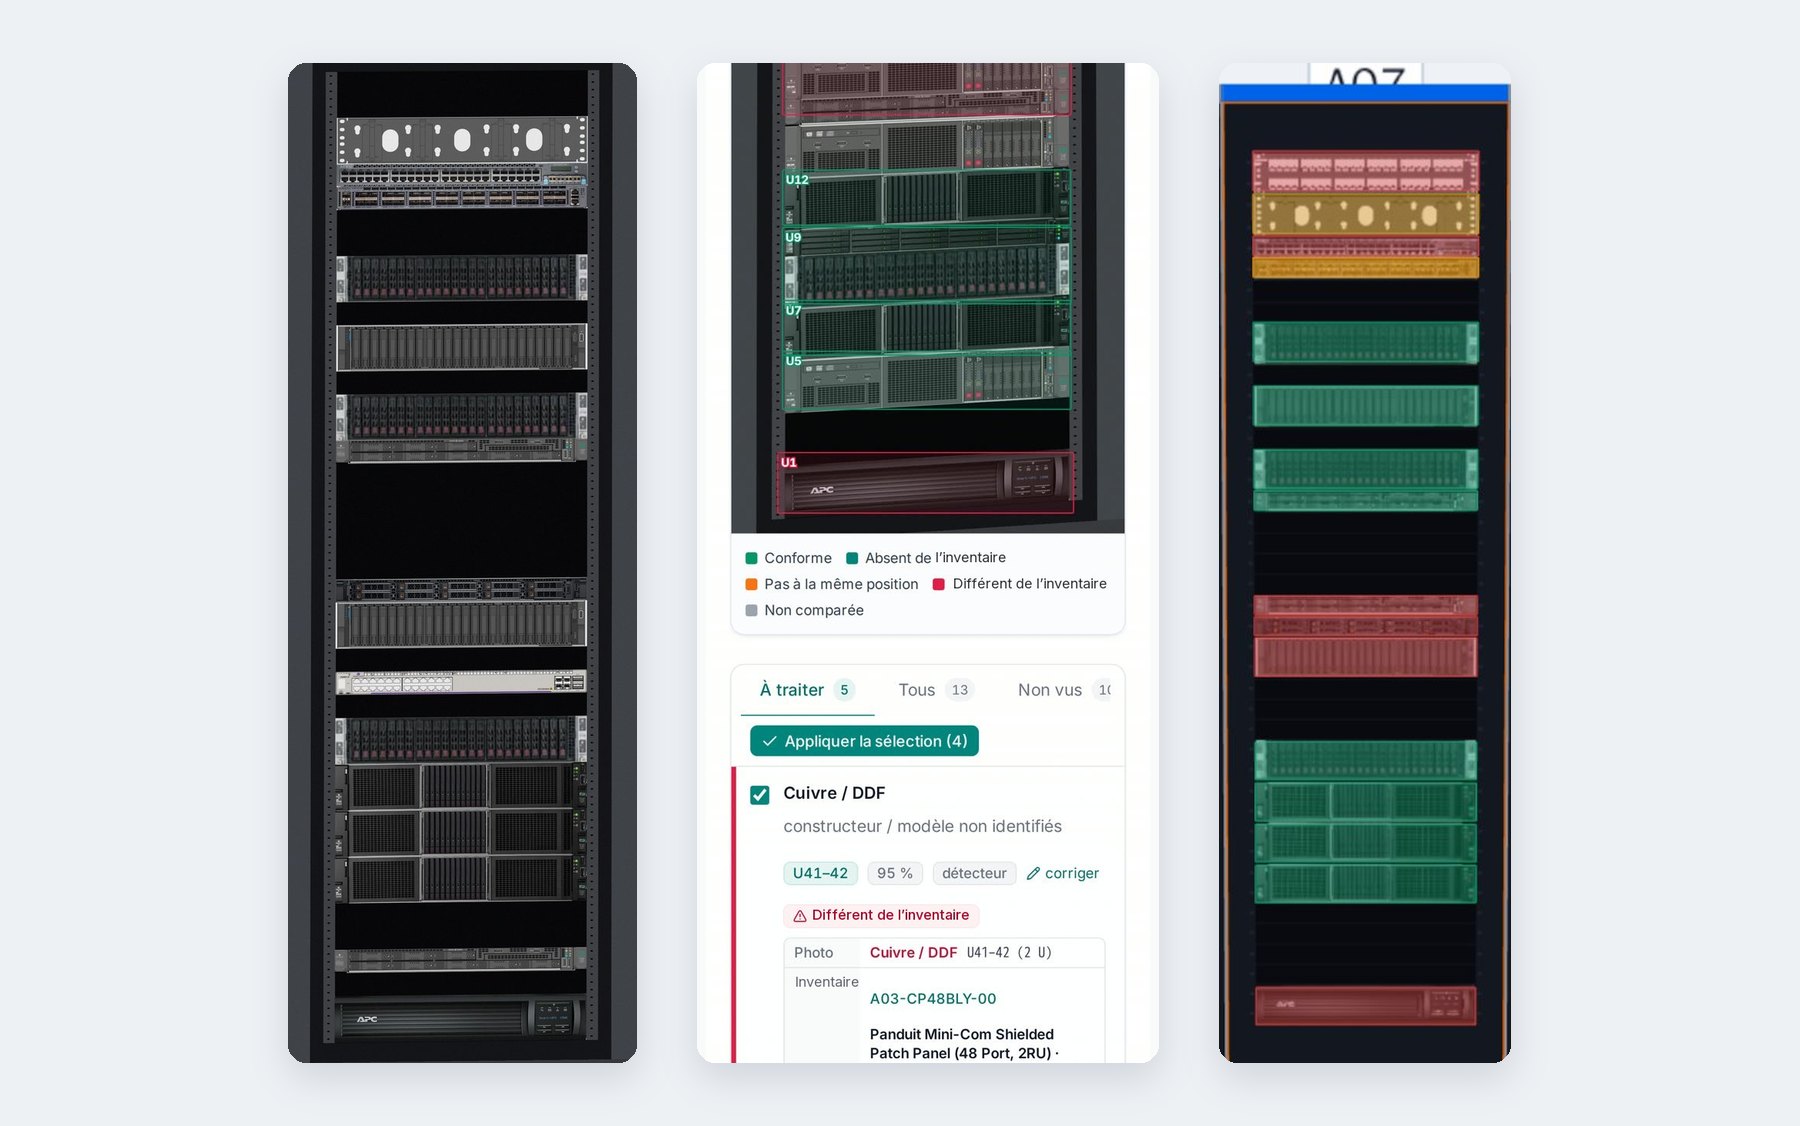
This article is based on a real survey from the demo bench: rack A07 of the “Demo Datacenter Paris”.
First step: recognizing the rack
Before comparing, you must be sure you are comparing the right rack. When you start from a rack in the inventory, the question does not arise. But a photo can also arrive without precise context, or be attached by mistake to the neighboring rack.
The platform therefore compares the photo with several candidate racks and calculates a score for each. On the demo bench, the photo of rack A07 gets a score of 8.5, against 2 for B03, the next candidate. Such a clear gap leaves little doubt. When the scores are close, the platform flags it and lets you choose.
Realigning positions
The U position read from a photo can be offset: the photo does not always show the bottom of the rack, or the U numbering starts elsewhere. To avoid wrongly flagging every device as “not in the same position”, the platform first looks for reference points: devices found exactly at their U in the inventory. It uses them to correct the offset of the whole photo, then it compares.
This realignment is shown clearly at the top of the survey, with the number of reference points used and the corrected offset. If the realignment looks wrong to you, the “Realign” button lets you redo it.
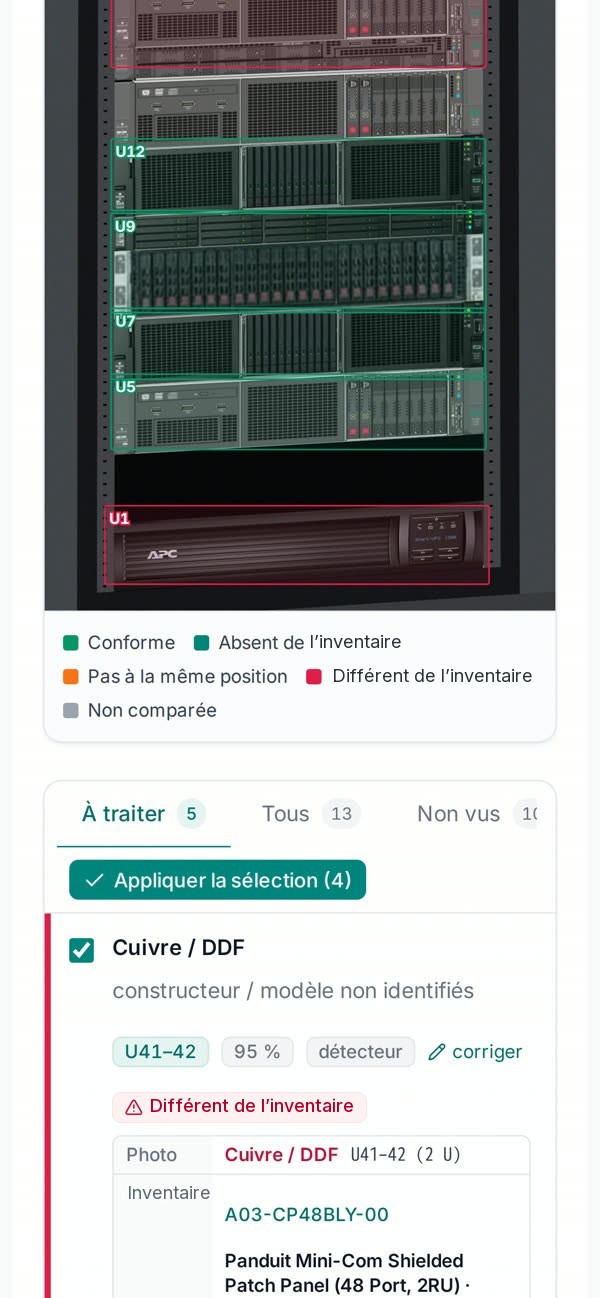
The six possible results
After realignment, each U of the rack falls into one of the following six cases.
| Result | What it means | Usual action |
|---|---|---|
| Matching | Same device, same position | None |
| Different from the inventory | A device is there, but not the one described | Check, then correct the inventory or the photo |
| Not in the same position | The device exists, at another U | Update the position |
| Missing from the inventory | Seen in the photo, unknown to the inventory | Create the device after checking |
| In the inventory, not seen | Declared, nothing at that place in the photo | Check on site before removing |
| Out of view | On the other face, not photographed | None, or a photo of the other face |
The colored bar at the top of the survey gives the breakdown at a glance. Discrepancies “to handle” are those that require a decision: on rack A07 of the bench, there are 2.
Reading a discrepancy line
Each discrepancy is shown as a two-column line: what the photo shows, what the inventory says. Both cover the same U range, which makes the difference readable without going back and forth.
On rack A07, for example, the photo shows a patching device at the same location where the inventory describes a cable manager. The line shows the family seen in the photo, the position, the detection confidence and the device expected by the inventory. Clicking the line highlights the corresponding box on the photo.
When the photo does not allow the manufacturer or model to be identified, the platform says so: “manufacturer / model not identified”. It then proposes a generic type, marked “to check: generic type”, and a link to choose the official type among those in the inventory. It does not invent a model.
The “All” lines group all detected devices, matching ones included. Going through them lets you check at a glance that the comparison is consistent with the photo, before handling the discrepancies one by one.
“Not seen” is not “absent”
The trickiest result is “in the inventory, not seen”. It only means that nothing was detected at that place in the photo. The possible causes are many: the device may indeed have been removed, but it may also be hidden by cabling, poorly lit, or mounted only at the rear.
That is why these lines are placed in a separate tab, “Not seen”, and are not automatically listed among the discrepancies to handle. The platform also clearly separates “out of view” devices, declared on the other face of the rack: they are not visible on a front photo, and that is not an anomaly.
Handling discrepancies
Discrepancies are handled in the “To handle” tab. For each one, you can modify the proposal, correct it or ignore it. Checked lines are applied together with “Apply selection”.
Nothing is written to the inventory without this explicit action. If your organization has enabled it, two-level approval adds a step: one person proposes, another approves. Pending proposals appear in the “To approve” tab, and the history keeps every decision. The article Two-level approval before writing to the inventory details how this works.
An ignored discrepancy is not lost: it remains visible in the survey and in its history. If the field changes, a new survey of the same rack will start from the current state of the inventory, not from past decisions.
Once handled, discrepancies disappear from the list and the rack can move to “up to date” on the audit page. The survey remains available with its photo, and can be exported.